Picture this...you're a data engineer for Blah Company. They would like to move some sales data from one Azure SQL database to another for archiving and analysis. You've been tasked with creating an Azure Data Factory pipeline to accomplish this goal and to perform data transformations along the way. Follow along as we complete this project.
To summarize, we're going to be taking data from our Production web database & using Azure Data Factory to transform & move that data into our Archive database. We're going to be transforming that data by removing the timestamp, leaving a simple Month/Date/Year format.

Note: In order to complete this lab, you must have a SQL server, two SQL databases, Data Factory Service, test data.

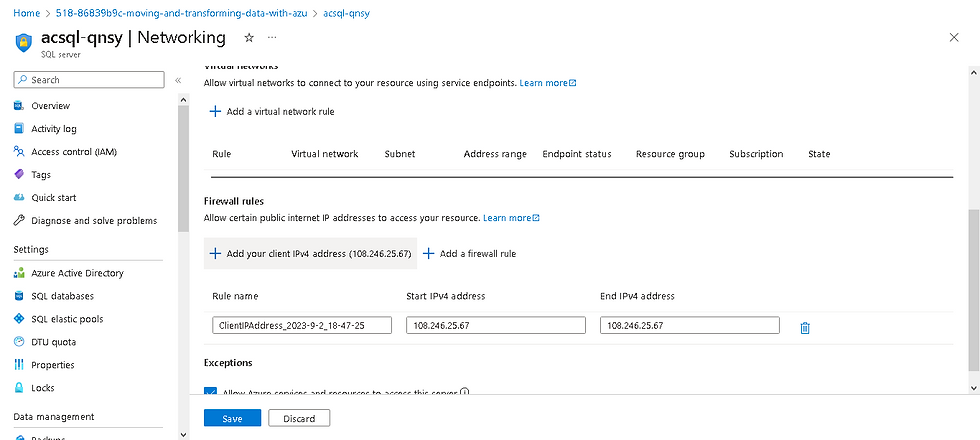
Step 1: Add our IP address to the SQL Server firewall to allow us to interact with our databases freely.
From the Azure Portal overview, open the SQL server.
Under the Security > Networking section in the Public access tab, go under Firewall rules and click Add your client IPv4 address ([Your public IP shown]).
Click Save.
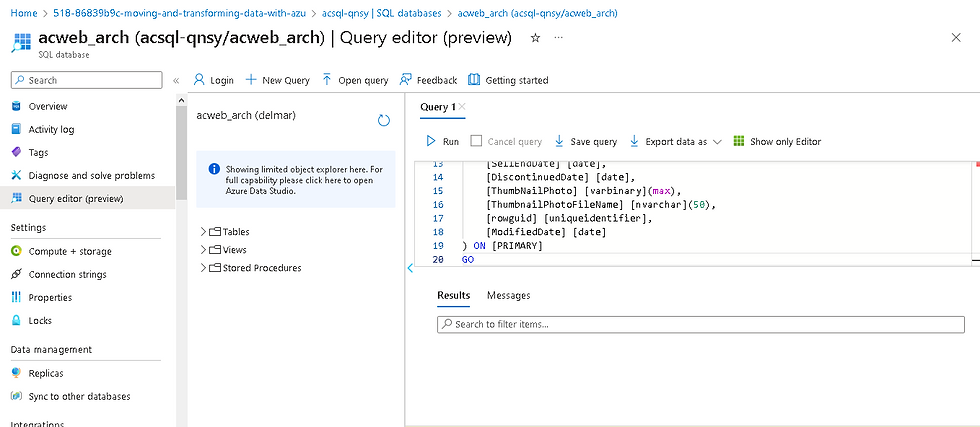
Step 2: Create a Destination table for the Archived data.
In the left-hand menu, click SQL databases.
Click the appropriate database. Ours is acweb_arch.
In the left-hand menu, click Query editor (preview).
Login using your credentials.
Click Ok.
Copy and paste the following code into the query box and click Run:
CREATE TABLE [dbo].[ProductArchive](
[ProductID] [int],
[Name] [nvarchar](40),
[ProductNumber] [nvarchar](25),
[Color] [nvarchar](15),
[StandardCost] [money],
[ListPrice] [money],
[Size] [nvarchar](5),
[Weight] [decimal](8, 2),
[ProductCategoryID] [int],
[ProductModelID] [int],
[SellStartDate] [date],
[SellEndDate] [date]
, [DiscontinuedDate] [date],
[ThumbNailPhoto] [varbinary](max),
[ThumbnailPhotoFileName] [nvarchar](50),
[rowguid] [uniqueidentifier],
[ModifiedDate] [date]
) ON [PRIMARY]
GO
Step 3: Create a Pipeline to move the data.
In a second tab, return to the Azure Portal overview, and open the Data factory (V2) resource.
Click Launch Studio.

Click the blue "New" button and choose Pipeline.
Once the page has loaded, click Create pipeline.
Rename your pipeline (pipeline1) to Product Migration.
Under Move & Transform, drag and drop a Data flow task to the pipeline.
Rename the task Product Archive and click the Settings tab.

Next to Data flow, click + New.
Click Add Source.
Rename your dataflow1 to be Product Archive.
Under Source settings, name the Output stream name acweb.
Next to Dataset, click + New.
Select Azure SQL Database and click Continue.

For the name, enter acweb_product, and for the Linked service, select + New.
Name the linked service acweb, and under Azure subscription, select your environment's subscription.

For the Server name, select the server in your resource group.
For the Database name, select acweb.
Under Authentication type, choose SQL Authentication. Enter your credentials.

Click Test connection.
Once the test is successful, click Create.

For the Table name, select SalesLT.Product.
Click Ok.
Step 4: Convert the Date Columns.
In the pipeline, next to the acweb data flow, click the + icon, and select Derived Column.
At the bottom of the page, under Output stream name, enter DateTransform.
Under Columns, set up the following. There will be 4 columns, each with a corresponding expression.
Copy and paste the expressions below for each column:
SellStartDate: toDate(substring(toString(SellStartDate),1,10))
SellEndDate: toDate(substring(toString(SellEndDate),1,10))
DiscontinuedDate: toDate(substring(toString(DiscontinuedDate),1,10))
ModifiedDate: toDate(substring(toString(ModifiedDate),1,10))

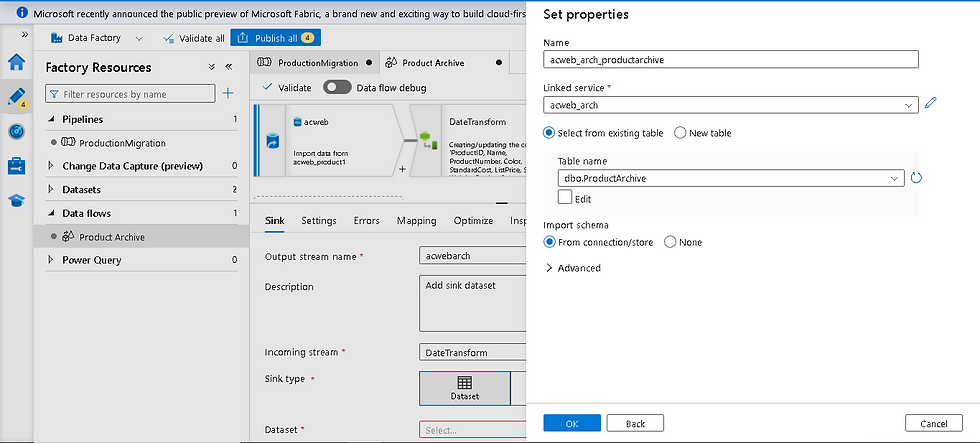
In the pipeline, next to the DateTransform task, click the + icon, and under Destination, select Sink.
At the bottom of the page, under Output stream name, enter acwebarch.
Next to Dataset, click + New.
Select Azure SQL Database and click Continue.
For the name, enter acweb_arch_productarchive, and for the Linked service, select + New.
Name the linked service acweb_arch, and under Azure subscription, select the lab-provided subscription.
For the Server name, select the server in your resource group.
For the Database name, select acweb_arch.
Enter the your credentials for the User name and Password, and click Test connection:
Once the test is successful, click Create.
For the Table name, select dbo.ProductArchive.
Click Ok.
At the top of the page, click Publish all, then "Publish".

Once finished, click the Product Migration tab.
Click Add trigger, and select Trigger now.
Click Ok.
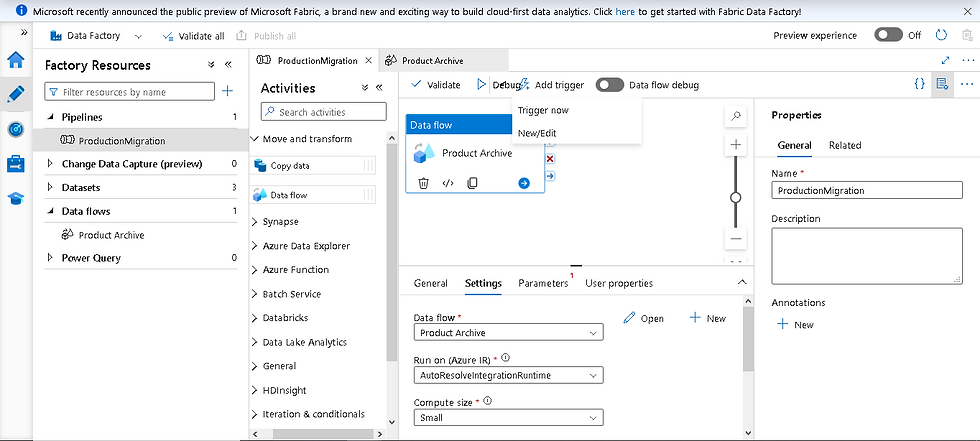


Using the left-hand menu, navigate to the Monitor section and monitor the progress.
Once completed, navigate back to the Query editor tab, and run the following query: SELECT * FROM dbo.ProductArchive

Congratulations. You've just transformed & moved a dataset using Azure Data Factory! I'll continue with a few more lessons involving migration techniques in the future.
Stay tuned!
Comments